How To Record Your Screen On An Iphone Xr

How To Record Your Screen On An Iphone Xr


Record Screen on iPhone XR

If you own an iPhone XR, you might want to record your screen for different reasons. Maybe you want to create a tutorial, record gameplay, or save a video chat. Whatever your reason may be, the good news is that recording your screen on an iPhone XR is easy and straightforward. In this article, we will guide you through the process step-by-step.

A - Attention

Before we dive into the steps of how to record your screen on an iPhone XR, let's first make sure you have everything you need. First, make sure your iPhone XR is updated to iOS 11 or later. Second, ensure that your iPhone XR has enough storage space to save the recorded video. Lastly, make sure that your iPhone XR is fully charged or plugged into a power source as recording your screen can drain your battery quickly.

I - Interest

Now that you have everything you need let's get started with the steps of how to record your screen on an iPhone XR.

D - Details

Step 1: Go to your iPhone XR's Control Center by swiping down from the top-right corner of your screen.

iPhone XR Control Center

Step 2: Tap on the "Screen Recording" icon, which looks like a circle inside a circle.

iPhone XR Screen Recording Icon

Step 3: A countdown of three seconds will appear, indicating that your iPhone XR is about to start recording. During this countdown, you can go to the app or screen you want to record.

iPhone XR Screen Recording Countdown

Step 4: To stop recording, tap on the red "Recording" icon at the top-left corner of your screen. Alternatively, you can also go to your iPhone XR's Control Center and tap on the "Screen Recording" icon again to stop recording.

iPhone XR Stop Recording

Step 5: Your recorded video will be saved to your iPhone XR's Camera Roll or Photos app. You can edit, share or delete the recorded video from there.

A - Action

Congratulations! You have successfully recorded your screen on an iPhone XR. Now, you can use this feature to create different types of content or save memories from your phone.

Schema JSON-LD and Rich Snippet

Meta Description and Keywords

How To Record Calls On Samsung A30

How To Record Calls On Samsung A30


Record Call Samsung A30

If you are looking for a way to record calls on your Samsung A30, you have come to the right place. Recording calls can be useful for various reasons such as keeping a record of important conversations or for legal purposes. In this article, we will guide you through the steps to record calls on your Samsung A30.

Step 1: Check Local Laws

Before you start recording calls, make sure to check the local laws in your area. In some countries, it is illegal to record calls without the consent of the other party. Be sure to follow the legal guidelines to avoid any legal repercussions.

Step 2: Use Built-in Call Recorder

The Samsung A30 comes with a built-in call recorder that allows you to record calls without the need for any third-party apps. Here's how to use it:

  1. Open the Phone app on your Samsung A30.
  2. Dial the number you want to call.
  3. Tap the three-dot menu button on the top right corner of the screen.
  4. Select 'Record' from the drop-down menu.
  5. The call recording will start automatically.
  6. After the call is finished, the recording will be saved in the 'Call' folder in your phone's internal storage.

Phone App Samsung A30

Step 3: Use Third-Party Apps

If your Samsung A30 doesn't have a built-in call recorder or if you want more advanced features, you can use third-party apps. There are many call recording apps available on the Google Play Store. Here are some of the best call recording apps for Samsung A30:

  • Automatic Call Recorder
  • Call Recorder ACR
  • Cube Call Recorder ACR

To use these apps, simply download and install them from the Google Play Store. Once installed, follow the instructions to set up the app and start recording calls.

Step 4: Manage Your Call Recordings

After recording calls, it's essential to manage your recordings properly. Here are some tips:

  • Organize your recordings by creating folders for different contacts or topics.
  • Backup your recordings to a cloud storage service or your computer.
  • Delete unwanted recordings to free up space on your phone.

With these tips, you can easily manage your call recordings and keep them safe.

Conclusion

Recording calls on your Samsung A30 can be a useful feature, but you need to make sure you follow the legal guidelines in your area. You can use the built-in call recorder or third-party apps to record calls. Remember to manage your call recordings properly to keep them safe and organized.

How Do You Screen Record On An Iphone Xr?

How Do You Screen Record On An Iphone Xr?


Screen recording on an iPhone XR can be a useful tool for capturing moments, creating tutorials, or troubleshooting issues. However, some users may be unsure of how to access this feature. In this article, we will guide you through the steps to screen record on an iPhone XR.

iPhone XR Screen Recording

Step 1: Enable Screen Recording

The screen recording feature is not enabled by default on an iPhone XR. To enable it, go to your device's Control Center by swiping down from the top-right corner of the screen. Then, tap on the "Screen Recording" icon, which looks like a circle surrounded by another circle. If you don't see this icon, you may need to add it to your Control Center by going to Settings > Control Center > Customize Controls and adding "Screen Recording" to the list.

Enable Screen Recording on iPhone XR

Step 2: Start Screen Recording

Once you have enabled the screen recording feature, you can start recording your screen by following these steps:

  1. Open the app or screen that you want to record.
  2. Swipe down from the top-right corner of the screen to access the Control Center.
  3. Tap on the "Screen Recording" icon.
  4. The icon will turn red, indicating that the recording has started.
  5. To stop the recording, tap on the red status bar at the top of the screen and then tap "Stop".
iPhone XR Screen Recording Icon

Step 3: Save and Share Your Recording

After you have stopped the recording, it will be automatically saved to your device's Photos app. From there, you can edit, trim, or share the recording with others. To access your recording, go to the Photos app and look for the "Screen Recordings" album.

iPhone XR Photos App

Tips for Screen Recording on an iPhone XR

Here are some additional tips to help you make the most of the screen recording feature on your iPhone XR:

  • Keep your device charged or plugged in while recording to avoid running out of battery.
  • Turn off notifications and alerts to prevent interruptions during the recording.
  • Use a stylus or your finger to highlight or draw on the screen while recording.
  • Consider using a microphone or external audio source to improve the sound quality of your recording.

Conclusion

Screen recording on an iPhone XR is a simple and useful feature that can enhance your mobile experience. By following the steps outlined in this article, you can easily access and use this feature on your device. Whether you're creating content or troubleshooting issues, screen recording can help you capture and share important moments.

How To Screen Record Iphone Xr

How To Screen Record Iphone Xr


iphone screen record

Screen recording is a great feature that allows you to capture video footage of your iPhone screen. If you own an iPhone XR, you might be wondering how to screen record on it. Luckily, it's a simple process that can be accomplished in just a few steps. In this article, we'll walk you through the process of how to screen record on your iPhone XR.

A - Attention: Why You Need to Screen Record on Your iPhone XR

There are many reasons why you might want to screen record on your iPhone XR. Perhaps you want to create a tutorial for an app or game, or maybe you want to capture a video call with friends or family. Whatever the reason, screen recording is a useful tool that can help you capture important moments on your phone.

iphone screen record tutorial

I - Interest: How to Screen Record on Your iPhone XR

Now that you know why screen recording is important, let's talk about how to do it on your iPhone XR. Here's a step-by-step guide:

  1. Open the Control Center by swiping down from the top-right corner of the screen.
  2. Tap the screen recording icon (it looks like a circle with a dot inside).
  3. A countdown will appear, giving you three seconds to prepare. After the countdown, your iPhone XR will start recording.
  4. To stop recording, simply tap the red recording icon in the top-left corner of the screen.

It's that easy! Once you've stopped recording, your video will be saved to your camera roll.

D - Desire: Tips for Screen Recording on Your iPhone XR

Now that you know how to screen record on your iPhone XR, here are a few tips to help you get the most out of this feature:

  • Make sure you have enough storage space on your phone before you start recording.
  • Consider using an external microphone for better audio quality.
  • Experiment with different recording settings to find the one that works best for your needs.
  • Practice makes perfect! The more you screen record, the more comfortable you'll become with the process.

A - Action: Start Screen Recording on Your iPhone XR Today!

Now that you know how to screen record on your iPhone XR, it's time to start using this powerful feature. Whether you're creating a tutorial, capturing a video call, or simply recording a funny moment on your phone, screen recording is a useful tool that can help you capture important moments on your device.

How To Enable Screen Record On Iphone Xr

How To Enable Screen Record On Iphone Xr


iPhone Screen Record

Are you looking for a way to record your iPhone XR screen? Screen recording can be useful for creating tutorials, sharing gameplay, or capturing a funny moment. Fortunately, enabling screen record on iPhone XR is easy to do. In this article, we'll walk you through the steps to enable screen record on iPhone XR.

Step 1: Open Control Center

iPhone Control Center

The first step to enable screen record on iPhone XR is to open the Control Center. To do this, swipe down from the top-right corner of the screen to access the Control Center.

Step 2: Add Screen Record Button

iPhone Add Button

Next, you need to add the screen record button to the Control Center. To do this, tap the "Customize Controls" button at the bottom of the Control Center.

iPhone Customize Controls

Scroll down until you see the "Screen Recording" option and tap the plus sign (+) next to it to add it to the Control Center. Then, tap "Done" in the top-right corner to save your changes.

Step 3: Start Screen Recording

iPhone Start Recording

Now that you've added the screen record button to the Control Center, you can start recording your iPhone XR screen. To do this, open the app or screen you want to record and swipe down to access the Control Center. Tap the screen record button (it looks like a circle with a dot inside) to start recording.

iPhone Recording

You'll see a three-second countdown before the recording starts. During the recording, a red bar will appear at the top of the screen to indicate that the recording is in progress.

Step 4: Stop Screen Recording

iPhone Stop Recording

To stop the screen recording, simply tap the red bar at the top of the screen and tap "Stop" in the pop-up menu. The recording will be automatically saved to your Photos app.

Enabling screen record on iPhone XR is a simple process that can be done in just a few steps. With screen recording, you can capture and share your iPhone XR screen with ease.

How To Screen Record On Iphone Xr

How To Screen Record On Iphone Xr


iPhone XR Screen Recording

Are you an avid iPhone XR user who wants to capture and share your screen with others? Screen recording on iPhone XR is a useful feature that can help you do just that. In this article, we will guide you on how to screen record on iPhone XR.

Step 1: Open Control Center

iPhone XR Control Center

To access the screen recording feature, you need to open Control Center. To do so, swipe down from the top-right corner of the screen on your iPhone XR.

Step 2: Add Screen Recording Icon

Add Screen Recording Icon iPhone XR

If you don't see the screen recording icon in Control Center, you need to add it. To do so, go to Settings > Control Center > Customize Controls and tap the + button next to Screen Recording.

Step 3: Start Screen Recording

Start Screen Recording iPhone XR

Once you have added the screen recording icon to Control Center, you can start recording your screen. To do so, open the app or screen you want to record and then tap the screen recording icon in Control Center. You will see a three-second countdown before the recording starts.

Step 4: Stop Screen Recording

Stop Screen Recording iPhone XR

To stop the screen recording, you can either tap the red status bar at the top of the screen and then tap Stop, or you can open Control Center and tap the screen recording icon again.

Step 5: Save Screen Recording

Save Screen Recording iPhone XR

After stopping the screen recording, you can save it to your Photos app. The recording will be saved as a video file, which you can share or edit as you wish.

Step 6: Edit Screen Recording

Edit Screen Recording iPhone XR

If you want to edit your screen recording, you can do so using the built-in editing tools in the Photos app. You can trim the video, add filters, and even add music to your recording.

Step 7: Share Screen Recording

Share Screen Recording iPhone XR

Finally, you can share your screen recording with others. You can do so by opening the Photos app, selecting the recording, and then tapping the share icon. You can share the recording via message, email, or social media.

Conclusion

Screen recording on iPhone XR is a simple and useful feature that can help you capture and share your screen with others. By following the steps outlined in this article, you can easily screen record on your iPhone XR and share your recordings with others.

Screen Record Xr: A Comprehensive Guide To Screen Recording On Iphone

Screen Record Xr: A Comprehensive Guide To Screen Recording On Iphone


Screen Record XR

Screen recording is a valuable tool that allows you to record your iPhone screen for various purposes, such as creating tutorials, demonstrating the use of an app, or capturing gameplay. While iOS has had a built-in screen recording feature since iOS 11, many users still struggle to record their screens effectively. This is where Screen Record XR comes in. In this article, we'll take a closer look at what Screen Record XR is, how it works, and why it's worth using.

What is Screen Record XR?

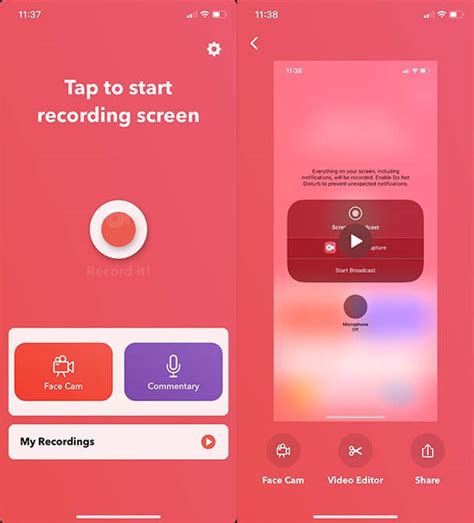
Screen Record XR is a screen recording app for iPhone that allows you to record your screen with high quality and without any time limit. It's an easy-to-use app that lets you start recording with just one tap, and it offers a variety of features to enhance your recording, such as adding a voiceover or capturing your face using the front-facing camera.

Screen Record XR interface

How Does Screen Record XR Work?

Screen Record XR works by using the built-in screen recording feature in iOS and enhancing it with additional features. When you open the app, you'll see a simple interface that lets you start recording with just one tap. You can choose to record your entire screen or just a specific area, and you can also add a voiceover or capture your face using the front-facing camera.

One of the best things about Screen Record XR is that it doesn't impose any time limit on your recording. You can record for as long as you want, and the app will automatically save your recording to your camera roll when you're done.

Why Use Screen Record XR?

Screen Record XR offers several advantages over the built-in screen recording feature in iOS. Here are some of the reasons why you might want to use it:

Higher Quality

Screen Record XR records your screen in high quality, which means that your videos will look sharper and clearer than if you were to use the built-in screen recording feature in iOS.

No Time Limit

Unlike the built-in screen recording feature in iOS, Screen Record XR doesn't impose any time limit on your recordings. This means that you can record for as long as you want without having to worry about the app stopping your recording.

Additional Features

Screen Record XR offers a variety of additional features that you won't find in the built-in screen recording feature in iOS. For example, you can add a voiceover or capture your face using the front-facing camera. These features can help you create more engaging and informative videos.

Easy to Use

Screen Record XR is incredibly easy to use. With just one tap, you can start recording your screen, and the app's simple interface makes it easy to customize your recording settings.

How to Use Screen Record XR

Using Screen Record XR is incredibly easy. Here's a step-by-step guide:

Step 1: Download Screen Record XR

The first step is to download Screen Record XR from the App Store. The app is free to download and use, but it does offer in-app purchases if you want to unlock additional features.

Step 2: Open Screen Record XR

Once you've downloaded the app, open it from your home screen.

Step 3: Customize Your Recording Settings

Before you start recording, you can customize your recording settings by tapping on the gear icon in the top-right corner of the screen. Here, you can choose to record your entire screen or just a specific area, enable or disable the microphone, and enable or disable the front-facing camera.

Step 4: Start Recording

Once you've customized your recording settings, tap on the red record button to start recording. You'll see a three-second countdown, and then your recording will begin.

Step 5: Stop Recording

To stop recording, simply tap on the red stop button in the top-left corner of the screen. Your recording will automatically be saved to your camera roll.

Conclusion

Screen Record XR is a powerful screen recording app for iPhone that offers several advantages over the built-in screen recording feature in iOS. With high-quality recordings, no time limit, and additional features like voiceover and front-facing camera capture, Screen Record XR is an excellent choice for anyone who needs to record their screen on iPhone. If you're looking for a reliable and easy-to-use screen recording app, Screen Record XR is definitely worth checking out.

How To Get Screen Record On Iphone Xr

How To Get Screen Record On Iphone Xr


Screen Record on iPhone XR

Are you looking for a way to capture your iPhone XR screen? Screen recording is a useful tool that can help you share your gameplay, create tutorials, or troubleshoot issues. Fortunately, the iPhone XR has a built-in screen recording feature that makes it easy to capture any activity on your device. In this article, we will guide you on how to get screen record on iPhone XR.

Step 1: Enable Screen Recording

Enable Screen Recording

The first step is to enable screen recording on your iPhone XR. To do this, go to "Settings" and tap on "Control Center." Scroll down to "Screen Recording" and tap the green plus sign to add it to your Control Center.

Step 2: Access Control Center

Access Control Center

After enabling screen recording, swipe up from the bottom of your screen to access the Control Center. You will see a circle icon with a dot inside it. This is the screen recording button.

Step 3: Start Recording

Start Recording

To start recording, simply tap on the screen recording button. A countdown will appear, giving you three seconds to prepare before the recording begins. Once the recording starts, a red bar will appear at the top of your screen, indicating that the recording is in progress.

Step 4: Stop Recording

Stop Recording

To stop recording, simply tap on the red bar at the top of your screen. You can also access the Control Center and tap on the screen recording button again to stop the recording. After stopping the recording, the video will be saved to your camera roll.

Step 5: Edit and Share

Edit and Share

Once you have recorded your screen, you can edit the video using the built-in editing tools. You can trim the video, add text, or crop the video. After editing, you can share the video on social media or send it to your friends and family.

Conclusion

Screen recording is a great feature that can help you capture your iPhone XR screen. With just a few simple steps, you can start recording your screen and share your content with others. We hope this article has helped you learn how to get screen record on iPhone XR. Happy recording!

How To Screen Record On An Iphone Xr

How To Screen Record On An Iphone Xr


iPhone XR Screen Recording

Screen recording is a great way to capture what's happening on your iPhone XR's display. Whether you're creating a tutorial or just want to save a funny video, this feature is incredibly useful. In this article, we'll show you how to screen record on an iPhone XR in just a few easy steps.

Step 1: Enable Screen Recording

iPhone XR Settings

The first thing you need to do is enable the screen recording feature on your iPhone XR. To do this, go to your iPhone's Settings app, then tap Control Center. From there, tap Customize Controls and add the Screen Recording option.

Step 2: Access Control Center

iPhone XR Control Center

Once you've enabled screen recording in your iPhone's settings, you can access it from the Control Center. To do this, swipe down from the top-right corner of your screen to open the Control Center.

Step 3: Start Recording

iPhone XR Screen Recording Button

Once you're in the Control Center, tap the Screen Recording button. You'll see a three-second countdown before the recording begins. During the recording, a red bar will appear at the top of your screen to let you know that it's still recording.

Step 4: Stop Recording

iPhone XR Stop Recording

To stop the screen recording, simply tap the red bar at the top of your screen and tap Stop. Alternatively, you can also stop the recording from the Control Center by tapping the Screen Recording button again.

Step 5: Save or Share the Recording

iPhone XR Screen Recording Saved

Once you've stopped the recording, you can save it to your camera roll or share it directly from the Control Center. To save it to your camera roll, go to the Photos app and look for the recording in your Recently Added album.

That's it! Now you know how to screen record on an iPhone XR. This feature may seem simple, but it can be incredibly useful in many different situations.

Tips and Tricks

- If you want to record audio along with your screen recording, make sure to turn on your iPhone's microphone before you start recording.

- You can edit your screen recordings using the built-in editing tools in the Photos app. This allows you to trim the recording and add text or other effects.

- If you're having trouble with the screen recording feature, try restarting your iPhone or updating to the latest version of iOS.

Conclusion

Screen recording on an iPhone XR is a simple and useful feature that can help you capture and share important moments. Whether you're creating a tutorial or just want to save a funny video, this feature is incredibly easy to use. So give it a try and see what you can create!

Screen Record On Iphone Xr: The Ultimate Guide

Screen Record On Iphone Xr: The Ultimate Guide


Are you looking for a way to record your iPhone XR screen? Whether you want to create a tutorial, capture gameplay, or save a video for future reference, the screen recording feature on your iPhone XR can come in handy. In this article, we'll show you how to record your screen on iPhone XR step by step, so you can create high-quality videos without any hassle.

What is Screen Recording on iPhone XR?

Screen recording is a feature available on iOS devices that allows you to capture everything that happens on your screen. This includes any taps, swipes, or gestures you make, as well as any audio that plays through your device. When you start recording your screen, everything on your iPhone XR will be captured in real-time, and you can save the video to your camera roll or share it with others.

How to Enable Screen Recording on iPhone XR

Before you can start recording your screen on iPhone XR, you need to enable the screen recording feature. Here's how to do it:

  1. Open the Settings app on your iPhone XR.
  2. Select Control Center.
  3. Tap Customize Controls.
  4. Scroll down to find Screen Recording.
  5. Tap the green plus icon next to Screen Recording to add it to your Control Center.

Now that you've added Screen Recording to your Control Center, you can start recording your screen with just a few taps.

How to Record your Screen on iPhone XR

Once you've enabled Screen Recording on your iPhone XR, you can start recording your screen at any time. Here's how to do it:

  1. Swipe up from the bottom of the screen to open Control Center.
  2. Tap the Screen Recording icon (it looks like a circle with a dot inside).
  3. Wait for the countdown to finish (or tap the red bar at the top of the screen to stop the recording).
  4. When you're finished recording, tap the red bar at the top of the screen to stop the recording.
  5. The video will be saved to your Camera Roll.

Tips for Recording your Screen on iPhone XR

Now that you know how to record your screen on iPhone XR, here are some tips to help you create high-quality videos:

  • Make sure your iPhone XR is fully charged before recording.
  • Clear any notifications or other distractions from your screen before recording.
  • Use a tripod or stabilizer to keep your iPhone XR steady while recording.
  • Speak clearly and loudly so that your voice is captured clearly in the video.
  • Use headphones to record audio if you're in a noisy environment.

Conclusion

Screen recording is a powerful feature on iPhone XR that can help you create high-quality videos for a variety of purposes. By following the steps outlined in this article, you can start recording your screen in no time. Whether you're creating a tutorial, capturing gameplay, or simply saving a video for future reference, screen recording on iPhone XR is easy and convenient.

Where Is Screen Record On Iphone Xr?

Where Is Screen Record On Iphone Xr?


Screen Record on iPhone XR

Are you looking for the screen record feature on your iPhone XR but can't seem to find it? Don't worry, you're not alone. The screen record feature is a useful tool that allows you to record your iPhone's screen and audio. It's perfect for creating tutorials, sharing gameplay, or capturing a particular moment on your phone.

Step-by-Step Guide to Finding Screen Record on iPhone XR

Follow these steps to find the screen record feature on your iPhone XR:

Screen Record on iPhone XR

Step 1: Open the Control Center

The first step is to open the Control Center. To do this, swipe down from the top-right corner of your iPhone XR screen.

Step 2: Find the Screen Record Icon

Once you've opened the Control Center, look for the screen record icon. It looks like a circle with a dot inside. If you can't find it, you may need to add it to your Control Center.

Step 3: Add Screen Record to Your Control Center

If you don't see the screen record icon in your Control Center, you can add it by following these steps:

  1. Go to Settings
  2. Tap Control Center
  3. Select Customize Controls
  4. Find Screen Recording and tap the green plus icon to add it to your Control Center

Step 4: Start Recording

Once you've found the screen record icon, simply tap it to start recording. You'll see a three-second countdown before the recording begins.

Tips for Using Screen Record on iPhone XR

Now that you know where to find the screen record feature on your iPhone XR, here are some tips for using it:

Tip 1: Use Airplane Mode

If you're recording a video that requires a lot of bandwidth, like a video call or streaming, consider turning on Airplane Mode to avoid interruptions.

Tip 2: Enable Microphone Audio

If you want to record audio along with your screen recording, make sure to enable microphone audio. You can do this by pressing and holding the screen record icon in the Control Center and selecting "Microphone Audio".

Tip 3: Edit Your Recording

After you've finished recording, you can edit your video using the built-in editing tools on your iPhone XR before sharing it with others.

Conclusion

The screen record feature on iPhone XR is a handy tool that can help you capture and share important moments on your phone. By following the steps outlined above, you'll be able to find and use this feature in no time.

How To Screen Record On Iphone 11 Pro Max

How To Screen Record On Iphone 11 Pro Max


Screen Record iPhone 11 Pro Max

Screen recording is a useful feature in iPhones that allows you to record your screen while you are using it. This feature can be helpful when you want to show someone how to do something on your phone or when you want to record a tutorial for your YouTube channel. In this article, we will show you how to screen record on the iPhone 11 Pro Max.

Step 1: Enable Screen Recording in Control Center

Enable Screen Recording iPhone 11 Pro Max

The first step to screen record on your iPhone 11 Pro Max is to enable the screen recording feature in the Control Center. To do this, follow these steps:

  1. Open the Settings app on your iPhone.
  2. Tap on Control Center.
  3. Tap on Customize Controls.
  4. Scroll down and find Screen Recording.
  5. Tap on the green plus button next to Screen Recording to add it to your Control Center.

Step 2: Open Control Center

Once you have enabled the screen recording feature in the Control Center, you can open it by swiping down from the top-right corner of your iPhone 11 Pro Max. You should see the Screen Recording icon in the Control Center.

Open Control Center iPhone 11 Pro Max

Step 3: Start Screen Recording

To start screen recording, follow these steps:

  1. Open the app or screen that you want to record.
  2. Open the Control Center.
  3. Tap on the Screen Recording icon. You should see a countdown timer of 3 seconds before the recording starts.
  4. Once the recording starts, the status bar at the top of your iPhone will turn red.
  5. To stop the recording, tap on the red status bar and tap on Stop.
Start Screen Recording iPhone 11 Pro Max

Step 4: Save Screen Recording

After you have stopped the screen recording, you can save it to your Photos app. To do this, follow these steps:

  1. Open the Photos app on your iPhone.
  2. Find the screen recording video that you just recorded.
  3. Tap on the video to open it.
  4. Tap on the Share icon.
  5. Choose the app or platform where you want to share the video.
Save Screen Recording iPhone 11 Pro Max

Conclusion

Screen recording is a useful feature in iPhones that can help you record your screen while using it. By following the steps outlined in this article, you should be able to screen record on your iPhone 11 Pro Max with ease.